![[LWN Logo]](/images/lc.png)
![[Timeline]](/images/Feature.png)
|
|
|
|
|
Weekly Edition Daily updates Events Calendar Book reviews Penguin Gallery This article was contributed by Giorgio Zoppi, who translated it from the original Italian. For those who prefer it, the Italian text is also available. |
Exploring SGML DocBook
IntroductionSuppose you have to write a handbook for your project and you have no much time, which editing tool would you use? In Linux several solutions exist, one of these is using SGML DocBook. SGML, acronym for Standard Generalized Markup Language, is a markup structured language. The essential characteristic of a markup language is that it explicitly distinguishes between document's semantics and its structure, emphasizing the latter. Moreover, since document's final result is usually based on its structure and its contents, SGML marks and determines how the general lines of a given document it will appear to the user, opening the possibility to use a single source in order to create differents formats. Every SGML document makes reference to a set of declarations, called the "DTD" (Document Type Definition), which contains a list of the available tags and rules on how they may be combined. The most famous DTD for SGML is certainly HTML, that surely you used when you built your web site. Docbook is a DTD purposely designed (and widely used) in order to create articles, books, and other technical works, but that does not exclude that it cannot be used for other document types. Document Creation ProcessDocbook document creation process is substantially different from the simple editing with a wordprocessor, because document's structure is partially independent from its representation. For example, when we create a table with a wordprocessor, in practice we "draw" it. Instead in Docbook, we indicate that in a such position, there's a table with given characteristics. We can characterize this creation process in this way: 
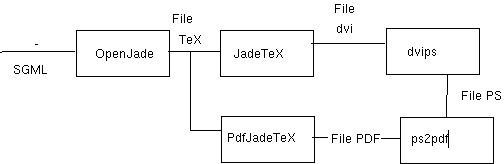
The figure indicates to us the different steps in order to obtain a document using SGML DocBook:
Installing the tools for DocBookThe installation of all the utilities which are necessary in order to create a correct DocBook document requires the following steps:
Before proceeding to the several installations, we should create the directory in which we would want to put the DTD, the ISO Entities and the stylesheets. We suppose that the directory is /usr/lib/sgml. Installing ISO entitiesDocBook makes reference to a standard entities series, that you can download from http://www.oasis-open.org/cover/ISOEnts.zip. These entities come from the docbook.cat file; to install it, you have to download it, and simply unpack in the directory /usr/lib/sgml. Unfortunately the names in the docbook.cat do not match, we must edit that file as described below in order that all work fine. Installing the DocBook catalogueI do not want to spend more than two words on this step because the documentation at http://www.docbook.org is really exhaustive. However it's sufficient to download the DocBook files, unpack them, put them in the directory /usr/lib/sgml. At this point you have to edit the catalog file (docbook.cat or catalog) in order to match ISO entities and finally to setup the enviroment variable SGML_CATALOG_FILES in your .bash_profile. This variable must point at your catalog file (i.e. SGML_CATALOG_FILES=/usr/lib/sgml/catalog). If you don't have time to spare for these two first steps, I advise you to download a docbook rpm or deb package. Installing OpenJadeIn this case the things are quite simple; once you have downloaded the package from the http://openjade.sourceforge.net, unpack it with tar and then do the classic: $ ./configure $ make $ make install There still are no rpm or deb packages of this software, however for those people who are not able to compile the application there is a similar application. It's called jade, and you can find it at http://www.jclark.com. Installing stylesheetsDownload them from http://nwalsh.com/docbook/dsssl, and unpack them in the directory /usr/lib/sgml. Installing JadeTeXThis is the most boring part of this article, above all for those who do not know TeX well. JadeTex in fact is not other that a set of macros for TeX, we must therefore compile these macros. In fact every time you give to TeX a file resulting from OpenJade processing, TeX must parse this file and give you an output format such as PDF or DVI. In order to make so that all works correctly, we must extend TeX, because it was designed to use a limited amount of resources during documents processing. For example, there is a maximum dimension and a maximum strings number that TeX can allocate in the stack. If a processing in execution exceeds these limits, TeX will complain and refuse to continue processing. Unfortunately, the OpenJade backend for TeX exceeds these limits. In order to extend Tex it is necessary to modify the texmf.cnf file in your TeX installation, adding the corrected parameters in order to JadeTeX to work. You can find the file texmf.cnf with the following commands: $ kpsewhich - expand-var '$TEXMFMAIN' /usr/share/texmf and therefore then: $ cd /usr/share/texmf/web2c $ ls - l texmf.cnf -rw-r--r- 1 root root 1997 Apr 6 1999 texmf.cnf Before modifying this file it is necessary to check if the hugelatex application exists in the current path: $ which hugelatex If you use TeTeX, this file is not present. hugelatex is a LaTex version with higher resource limits for the ability to processing of documents. If it is not present it is necessary to recompile LaTex. To recompile you have to go in the directory /usr/share/texmf/tex/latex/config, where you will find all the files needed in order to recompile LaTex. Copy these files into /tmp/config. And type: $ cd /tmp/config $ tex -ini -progname=hugelatex latex.iniThis last command will make a file called latex.fmt, rename it to hugelatex.fmt, and then move it to the directory web2c: $ mv latex.fmt hugelatex.fmt # mv hugelatex.fmt /usr/share/texmf/web2c Now we need to update the file texmf.cnf in the directory web2c, but first we save the original file: # cp texmf.cnf texmf.cnf.origYou open the textmf.cnf file, in the middle you will find the parameters similar to this: pool_size = 125000 pool_size.context = 750000Make in way that yours parameter they correspond to those indicated over and then you add the following lines: % hugelatex settings extra_mem_top.hugelatex=400000 extra_mem_bot.hugelatex=400000 hash_extra.hugelatex = 15000 pool_size.hugelatex = 5000000 string_vacancies.hugelatex = 45000 max_strings.hugelatex = 55000 pool_free.hugelatex = 47500 nest_size.hugelatex = 500 param_size.hugelatex = 1500 save_size.hugelatex = 5000 stack_size.hugelatex = 15000 % jadetex and pdfjadetex hash_extra.jadetex = 20000 hash_extra.pdfjadetex = 20000 pool_size.jadetex = 300000 pool_free.pdfjadetex = 300000 Now we've to create a link symbolic from Tex to hugelatex. # ln -s /usr/bin/tex /usr/bin/hugelatex Creating jadetex and pdfjadetexAt this point it we need to compile JadeTex. You go under the directory dsssl in the OpenJade package, where you will find all the necessary files in order to create jadetex and pdfjadetex. Before running the compilation, if you do not speak English, JadeTeX must be told to recognize your language. To do this you have to modify the file called jadetex.dtx, placed in OpenJade dsssl directory. You have to open that file and when you find:
\RequirePackage[german, frenchb, english]{babel}[1997/01/23 ]
Replace such line in this way:
\RequirePackage[your_language, german, frenchb, english]{babel}[1997/01/23 ]
Now save all and you're ready for the compilation, from root do:
# make -f Makefile.jadetex install
This command creates the file jadetex.fmt and pdfjadetex.fmt and it puts them in the directory /usr/share/texmf/web2c. Now all is left to do is create the following symbolic links:
      # ln -s /usr/bin/tex  /usr/bin/jadetex
      # ln -s / usr/bin/pdftex /usr/bin/pdfjadetex.
and to execute the command texhash so that yours Tex package sees the newly installed files. Optionally install sgml2xI'd like spend two words in more on this script. It's a frontend for OpenJade and OpenSp, executing automatically all the phases described in figure 2. Let's see an example: $ sgml2x --format html /home/deneb/articles/docbook.sgml /usr/bin/onsgmls:I: OpenSP version " 1.3.4 " sgml2x - (c) 2000 Giorgio Zoppi - email: gzoppi@cyberspace.org Loading init file: / etc/sgml2x.conf Just a moment: I m searching SGML Parser... found Just a moment: I' m searching openjade... found Start parsing SGML File... Parsing Ok. Let' s starting coversion in your specified format! Check out parsing.log, for warnings! Press any key to continuous... Start parsing SGML File by jade... Your html web pages are ready in the directory:/home/deneb/articles/docbook And simply you will have your files in the directory indicated. Now I belive that we are ready in order to write our first document in DocBook. Are you ready? Here the first documentNow i'd like to show you a hypothetical article, containing an image, one list and one formal table. Every line of this example will be explained, so that then you can with little effort, reading the handbook of DocBook at http://www.docbook.org, and create your own documents. Let's see the example then (the words after # is a my comment and they are not integrating part of the text): Example 1. The first document in DocBook <!DOCTYPE article PUBLIC " - / / OASIS//DTD DocBook V3.1//EN"> The first thing that you should note in a SGML file is the DTD definition. Every SGML document must begin with one document type declaration. This identifies the DTD that will be used in the document and which will be the element root, in this case article. < article class="whitepaper" id="first-example" lang="en"> Every article begins with a header, where there are the title, author and the several revisions of the same article.
This is the classic definition of header for an article. Now I will present pair of essential notes. The first is that every article must have a definition for the header. The second one is that every tag that previously had been opened (i.e. < nametag>), must then be closed (i.e. < nametag>). Well, we can continue with the example: # I open one section. Every section needs a title. Our title is First Para. <sect1><title>First para</title> This creates a first levelsection (subdivision of the document), that it needs of a title. # I open a paragraph with the tag para <para> In this paragraph I insert a figure: # and I insert a figure <figure><title>A penguin in action</title> <graphic fileref="fig/fig2"> </graphic> # I close the element figure </figures> # I close the paragraph </para> #I open a subsection of the previous section and i assign to it a title <sect2><title>First subsection</title> # I open a paragraph <para> Here a table: # I add one table <table> # I give to the table a caption <title>Table 1</title> # I logically divide one table by tgroup, and i give it the number of # columns (cols) and the name of the same ones (colname). <tgroup cols="5"> <colspec colname="coln1"> <colspec colname="coln2"> <colspec colname="coln3"> <colspec colnum="5" colname="coln5"> #it spans two columns, specifically the first and second column <spanspec namest="coln1" nameend="coln2" spanname="span-horiz" align="center"> # it spans two columns vertically specifically the second and the third column <spanspec namest="coln2" nameend="coln3" spanname="span-horiz-vert"align="center"> #defines the headings of the table through the section thead #beginning thead (header table) <thead> # heading line <row> # horizontal cells span <entry spanname="span-horiz"> <tbody> # first line <row> # various entries from first to last column <entry>Data11</entry> <entry>Data12</entry> <entry>Data13</entry> <entry>Data14</entry> <entry>Data15</entry> # end first line </row> # second line <row> # various entries from first to last column <entry>Data21</entry> <entry>Data22</entry> <entry>Data23</entry> <entry>Data24</entry> # more lines, span vertical, the attribute valign is the alignment <entry morerows="1"valign="middle"> vertical Span </ entry> # fine second gear line < / row> # beginning third tiga <row> <entry>Data31</entry> <entry spanname="span-horiz-vert" morerows="1" table </tgroup> # fine table </table> # fine paragraph </para> # end subsection </sect2> <sect2><title>Second subparagraph</title> <para>Here's a list:</para> # the tag itemizedlist it's for create a list, # instead the attribute mark is to indicate the pointer type to the list, # two used values are: opencircle and bullet. # Every element comes preceded from a tag listitem, <itemizedlist mark=opencircle> # first element <listitem><para>First item</para> </listitem> #according to element <listitem> <para>Second item</para> </listitem> #end list </itemizedlist> # end second subsection </sect2> # end section </sect1> # end article </article> ConclusionScope of this article was essentially to introduce you to DocBook, and to make to see you how works, therefore this article is now finished. We've learned to install and to make a short document. This article is not a complete description of DocBook; a complete description requires more then an article, but writing such articles I've afraid to duplicate already existing documentation. Do you want know more? Go to http://www.docbook.org. |